通过 C#代码进行数据绑定
在使用 C#代码进行数据绑定之前,要绑定的数据需要具有通知变更的能力,因此它需要继承自INotifyPropertyChanged并实现PropertyChanged接口
例如我们需要将一个TextBox的值与Class1的name属性绑定,我们可以这么做
首先在Class1中定义相关属性并实现接口
 1
 2
 3
 4
 5
 6
 7
 8
 9
10
11
12
13
14
15
16
17
18
19
20
21
22
23
24
25
26
27
28
|
// Class1.cs
using System;
using System.Collections.Generic;
using System.Collections.Specialized;
using System.ComponentModel;
using System.Linq;
using System.Text;
using System.Threading.Tasks;

namespace WpfApp1
{
    //继承INotifyPropertyChanged类
    class Class1 : INotifyPropertyChanged
    {
        //实现PropertyChanged接口
        public event PropertyChangedEventHandler? PropertyChanged;
        string name;
        public string Name {
            get { return this.name; }
            set { name = value;
                 //当属性变更时激发事件
                if(this.PropertyChanged != null) { PropertyChanged.Invoke(this, new PropertyChangedEventArgs("Name")); }

            }
        }

    }
}
|
PropertyChanged.Invoke方法接受 2 个参数,一个是事件来源,一个是属性变更事件的参数
然后我们就可以在xaml文件对应的cs文件中进行数据的绑定,首先要定义 Binding 对象并设置相关参数,参数包括数据源(Source),路径(Path),
绑定的目标属性
举一个例子,我现在将TextBox中所显示的值与Class1的 name 属性相绑定,那么 Source 就是Class1,Path 就是 Name,目标属性就是TextBox.TextProperty,
为什么是TextBox.TextProperty而不是TextBox.Text,那是因为他所绑定的必须是一个依赖属性,在WPF中带有Property后缀的通常就是一个依赖属性
我们在代码初始化后添加如下代码
1
2
3
|
Binding bind = new Binding();
bind.Source = class1;
bind.Path = new PropertyPath("Name");
|
然后调用BindingOperations.SetBinding方法进行绑定
1
|
BindingOperations.SetBinding(this.inputbox,TextBox.TextProperty, bind);
|
其实上面的代码可以简化为下面一行
1
|
this.inputbox.SetBinding(TextBox.TextProperty, new Binding("Name") { Source = class1 });
|
数据流的方向
在上面的代码中我们还可以设置一个 Mode 属性,用于指定数据流的方向,具体参照下面表格
| Mode |
解释 |
| OneWay |
数据单向绑定,只有当数据源变化时所绑定的对象才变化,而所绑定对象的值变化时数据源不变化 |
| TwoWay |
数据双向绑定,当数据源变化时所绑定的对象变化,所绑定对象的值变化时数据源也变化 |
| OneWayToSource |
数据单向绑定,与 OneWay相反,只有绑定对象的值变化时数据源变化,数据源变化时绑定对象的值不变化 |
| OneTime |
只有第一次加载时才显示数据源,以后则不随数据源而变化 |
示例代码
1
|
this.inputbox.SetBinding(TextBox.TextProperty, new Binding("Name") { Source = class1,Mode=BindingMode.OneTime });
|
控件与控件之间属性绑定
在xaml代码中,可以使用标记扩展的功能实现控件与控件之间的属性绑定,例如我们可以将一个TextBox的值与一个Slider的值进行绑定,就像下面这样

而要实现上面的效果只需要这几行代码
1
2
|
        <TextBox Text="{Binding Path=Value, ElementName=ASli}"></TextBox>
        <Slider x:Name="ASli" Maximum="1000"></Slider>
|
很简单就不过多解释了需要注意的一点是当我们改变TextBox的值,下面的 Slider 不会立即变化而是需要当TextBox失去焦点时,我们可以通过设置UpdateSourceTrigger的值来改变这一点,UpdateSourceTrigger可以设置为一下几个值
DataContext数据上下文
在上面的代码中我们实现了TextBox组件与Class1的name属性进行绑定,其中我们在xaml文件对应的 cs 文件中实例化了一个Class1对象,并进行了数据绑定,如果我们不想再cs文件中实例化对象进行数据绑定,我们便可以使用DataContext
我们在xaml界面添加如下代码
1
2
3
|
    <Window.DataContext>
        <local:Class1 Name="默认名称"></local:Class1>
    </Window.DataContext>
|
然后再进行数据绑定
1
|
<TextBox x:Name="inputbox" Height="88" FontSize="24" Text="{Binding Path=Name}"></TextBox>
|
当我们使用DataContext作为数据源时,无需手动设置它的Source属性,因此称之为无源数据绑定
而当我们的 C#代码需要访问它的DataContext时需要进行数据转换,如下
1
2
3
4
5
6
|
        private void OutputButton_Click(object sender, RoutedEventArgs e)
        {
            Class1 cl1 = (Class1)this.DataContext;
            this.outputbox.Text = cl1.Name;

        }
|
我们也可以在后端实例化对象,并将添加到页面的DataContext中,如下
首先实例化Class1对象
1
|
Class1 class1=new Class1() { Name = "name"};
|
然后再初始化代码后添加DataContext
1
|
this.DataContext = class1;
|
此时我们便无需在xaml中创建对象
将集合对象作为列表控件的 ItemsSource
我们可以将一个集合对象作为列表控件的ItemsSource,ItemsSource是 ItemControl 类的一个属性,任何继承自这个类的空间都可以设置 ItemSource 属性,例如ListBox,ItemsSource 属性作为它的数据源时它会自动迭代这个 List/Array 中的所有项,并将它们作为 ListBox 的每一项的数据源,我们还可以通过设置DisplayMemberPath属性为它们指定 Path,例如在下面这个例子中我们定义了一个列表,并初始化了一些内容,并将它与 ListBox 进行数据绑定
这是 Class1.cs 的内容
 1
 2
 3
 4
 5
 6
 7
 8
 9
10
11
12
13
14
15
16
17
18
19
20
21
22
23
24
25
26
27
28
29
30
31
32
33
34
35
36
37
38
39
40
41
42
43
44
45
46
47
48
49
50
51
52
53
54
55
56
|
using System;
using System.Collections.Generic;
using System.Collections.Specialized;
using System.ComponentModel;
using System.Linq;
using System.Text;
using System.Threading.Tasks;

namespace WpfApp1
{
    class Class1 : INotifyPropertyChanged
    {
        string name;
        public string Name {
            get { return name; }
            set { name = value;
                if(this.PropertyChanged != null) { PropertyChanged.Invoke(this, new PropertyChangedEventArgs("Name")); }

            }
        }
        int age;
        public int Age
        {
            get { return age; }
            set
            {
                age = value;
                if (this.PropertyChanged != null) { PropertyChanged.Invoke(this, new PropertyChangedEventArgs("Age")); }
            }
        }
        string phonetype;
        public string Phonetype
        {
            get { return phonetype; }
            set
            {
                phonetype = value;
                if (this.PropertyChanged != null) { PropertyChanged.Invoke(this, new PropertyChangedEventArgs("Phonetype")); }

            }
        }

        int id;
        public int ID
        {
            get { return id; }
            set
            {
                id = value;
                if (this.PropertyChanged != null) { PropertyChanged.Invoke(this, new PropertyChangedEventArgs("ID")); }
            }
        }

        public event PropertyChangedEventHandler? PropertyChanged;
    }
}
|
这里定义了一些属性,并实现了 PropertyChanged 接口,然后我们在 xaml 对应的 cs 文件中创建一个 Class1 类型的列表,并初始化一些值
 1
 2
 3
 4
 5
 6
 7
 8
 9
10
11
12
13
14
15
16
17
18
19
20
|
ObservableCollection< Class1 > olist = new ObservableCollection<Class1>() {
    new Class1 { Name = "小明",Phonetype="小米 13",ID=1,Age=14 },
    new Class1 { Name = "小花",Phonetype="华为 mate 60 pro",ID=2,Age=24 },
    new Class1 { Name = "小华",Phonetype="魅族 10",ID=3,Age=16 },
    new Class1 { Name = "小军",Phonetype="一加 8",ID=4,Age=19 },
    new Class1 { Name = "小俊",Phonetype="荣耀 11",ID=5,Age=10 },
    new Class1 { Name = "小胡",Phonetype="苹果 14",ID=6,Age=12 },
    new Class1 { Name = "小虎",Phonetype="OPPO A8",ID=7,Age=25 },
    new Class1 { Name = "小帅",Phonetype="Vivo X100",ID=8,Age=32 },
    new Class1 { Name = "小美",Phonetype="IQOO Neo 9",ID=9,Age=17 },
    new Class1 { Name = "小壮",Phonetype="小辣椒 1",ID=10,Age=16 },
    new Class1 { Name = "小丽",Phonetype="诺基亚 8",ID=11,Age=22 },
    new Class1 { Name = "李华",Phonetype="OPPO A5",ID=12,Age=43 },
};
//设置源和路径
this.ID_ListBox.ItemsSource = olist;
this.ID_ListBox.DisplayMemberPath = "Name";
//将TextBox与被选中的Items的ID绑定
Binding binding = new Binding("SelectedItem.ID") { Source=this.ID_ListBox};
this.ID_TextBox.SetBinding(TextBox.TextProperty,binding);
|
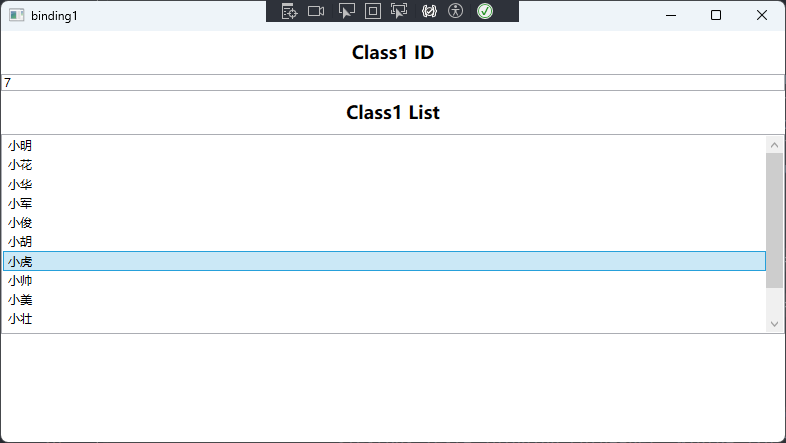
这里使用ObservableCollection而不是List是因为它实现了接口从而使列表的变化即时显示到控件当中,我们在 xaml 文件中显示一个 ListBox 控件以及显示每个项的 ID
1
2
3
4
5
6
7
|
    <StackPanel>
        <TextBlock FontWeight="Bold" FontSize="18" HorizontalAlignment="Center" Margin="10">Class1 ID</TextBlock>
        <TextBox x:Name="ID_TextBox"></TextBox>
        <TextBlock FontWeight="Bold" FontSize="18" HorizontalAlignment="Center" Margin="10">Class1 List</TextBlock>
        <ListBox Height="200" x:Name="ID_ListBox">
        </ListBox>
    </StackPanel>
|
运行结果如下
 \
\
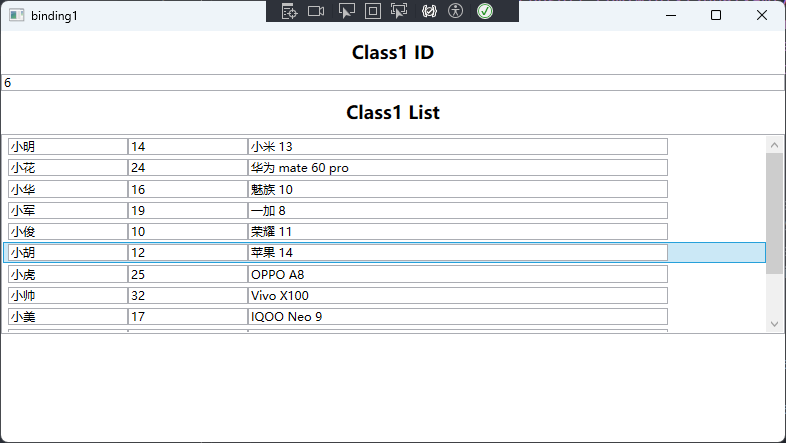
我们还可以通过自定义 ListBox 的数据模版自定义显示的内容,此时我们就不需要设置DisplayMemberPath而是在 xaml 文件中进行绑定
 1
 2
 3
 4
 5
 6
 7
 8
 9
10
11
12
13
14
15
16
|
    <StackPanel>
        <TextBlock FontWeight="Bold" FontSize="18" HorizontalAlignment="Center" Margin="10">Class1 ID</TextBlock>
        <TextBox x:Name="ID_TextBox"></TextBox>
        <TextBlock FontWeight="Bold" FontSize="18" HorizontalAlignment="Center" Margin="10">Class1 List</TextBlock>
        <ListBox Height="200" x:Name="ID_ListBox">
            <ListBox.ItemTemplate>
                <DataTemplate>
                    <StackPanel Orientation="Horizontal">
                        <TextBox Text="{Binding Path=Name}" Width="120"></TextBox>
                        <TextBox Text="{Binding Path=Age}" Width="120"></TextBox>
                        <TextBox Text="{Binding Path=Phonetype}" Width="420"></TextBox>
                    </StackPanel>
                </DataTemplate>
            </ListBox.ItemTemplate>
        </ListBox>
    </StackPanel>
|
参考内容
WPF 数据绑定
WPF 数据绑定与校验转换(上)